 |
Domain Name Registration - Web Development - Web site Hosting - Managed Web site Solutions - Internet Marketing |
| Nete-Quette |
| Home |
| Contact |
| About Us |
| WebSite Hosting |
| Managed Hosting |
| SSL Certificates |
| Remote Backup |
| BroadBand Plans |
| Overview |
| Transfer Existing Plan |
| New User ADSL Order |
| BroadBand 4 Business |
| New ADSL Business service |
| Transfer ADSL Business service |
| Voice Over IP |
| What is VOIP? |
| How Much Will I Save? |
| VOIP Plans |
| Order VOIP Service |
| Domain Names |
| What you need |
| Choose the right one |
| Register Yours |
| Domain Transfer |
| Computer Care |
| Scams,Malware and Spyware |
| Computer Crash |
| Anti-Virus |
| Spyware Scan |
| How to Backup |
| Password Tips |
| What's my IP? |
| Secure Your Network |
| Web site Tips/Tricks |
| Planning the site |
| Email Marketing |
| Tutorials |
| Making your First Website |
| Setting up Wordpress |
| Create A Favorite Icon |
| Email Set Up |
| Backup Wordpress |
| Changing memory limit for PHP |
Using Fantastico to Install Wordpress
Get Yourself Familiar with cPanel
If you chose Nete-Quette as a web web host then you have cPanel, you will have received an email with your cpanel login information shortly after signing-up. Your login URL normally combines your domain name and /cpanel.
From there you will be prompted for your username and password. To log into your cPanel, you will need the username and password that are available in your welcome email
2. Once logged in you’ll be staring at your cPanel’s home page. Yours may look a little different , but the functions will all remain the same.
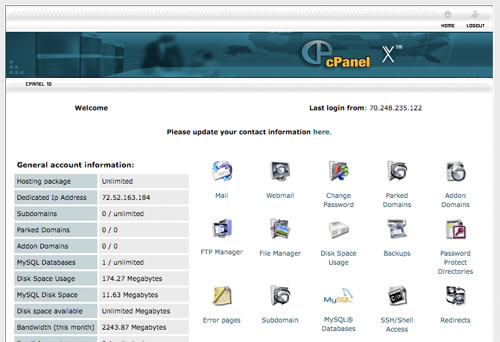
3. Here’s a close-up of the cPanel home page with many of its features. The primary reason for me to promote cPanel is because it allows you to manage your web hosting space through a user friendly web interface. As you can see in the images, it has a straightforward approach to utilising e-mail, viewing and FTP‘ing web files, checking your web sites statistics and visitors, but most especially if you’ll scroll to the bottom of the features you’ll see the Fantastico Auto Installer you’ll use to install your WordPress blog. Fantastico will also install many other addons for your web site but these will be covered in later tutorials. For now lets get on with the wordpress install using cpanel and fantastico.
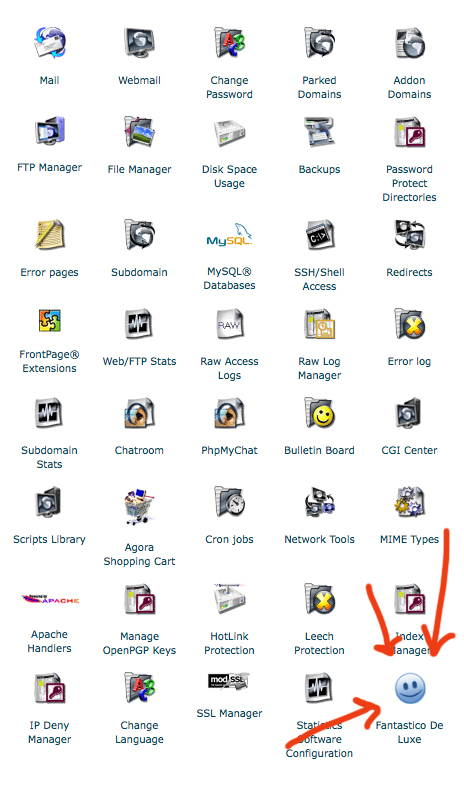
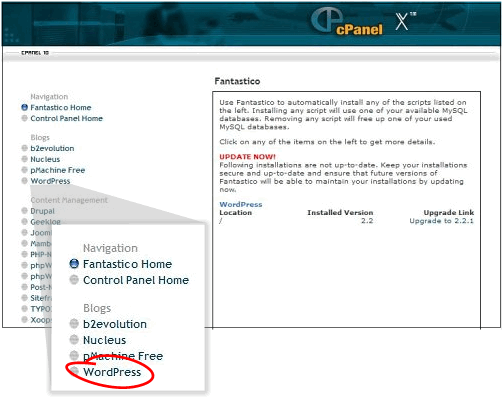
4. Click on the blue Fantastico icon shown above with the red arrows pointing towards it. As long as you have the available MySQL databases with your hosting account, Fantastico will automatically install any of the scripts you see listed on the fantastico page, including WordPress. The advantage of installing scripts via Fantastico is that its all automatic … making it easy squeezy to install the wordpress blogging software and it creates the databases and users for you.To begin your WordPress installation click on the “WordPress” text link in the “Blogs” category listed on the left. The below image will point you in the right direction if you cant see the wordpress install link.
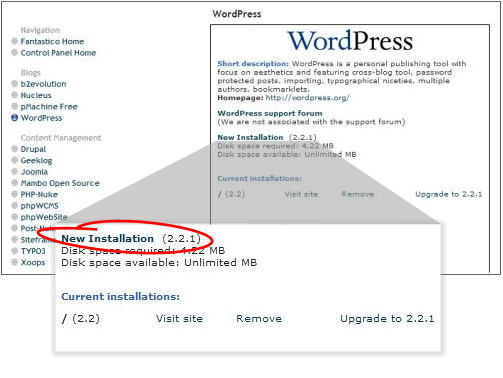
5. The WordPress script window will open on the right side of the new page. You can see that when we first took this screenshot, the domain had a Current Installation of WordPress. At that time It was running 2.2 and it was installed in the root directory ( indicated by the “/” ) on the web server.
As long as your hosting package has provided the MySQL databases for it, WordPress can be installed as many times as you desire in as many different directories you desire. Since this site was already running a version of WordPress in the root directory, we decided to set up a new version in a directory that we called “blog”.
To begin your installation of WordPress, find and click on the text link, New Installation within your cPanel.
6. Once you have clicked the New Installation text link Fantastico will populate some of the fields in the 1st of 3 pages toward your installation.
7. Other fields need to be completed by you, as your the new blog owner. These fields are highlighted in yellow in the image below and we have extra information about them one by one below the image if you need additional assistance filling in the fields.
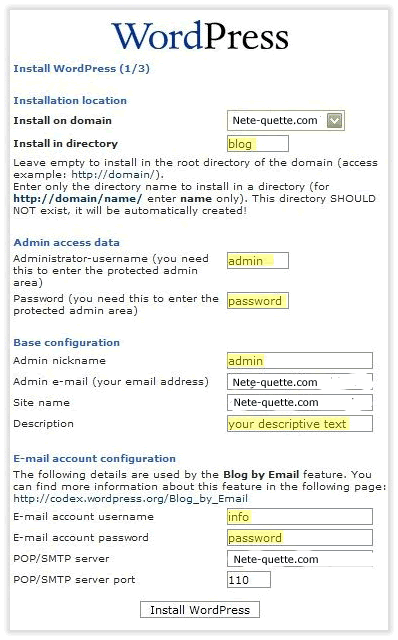
- DOMAIN - WordPress will automatically assume the domain to install the blog in, Some hosting packages allow you to host a few domains on the one account, so be sure that the correct domain is selected for the installation of your blog.
- DIRECTORY - You will need to decide what directory you want your wordpress blog installed in. In this instance and for the purpose of illustrations, we installed the blog in the /blog/ directory. You do not need to put the slashes “/” in the space - WordPress will do this. If installing in the root directory (at your main URL - www.yoursite.com), you leave this blank.
- ADMIN ACCESS DATA - First complete the “Administrator-Username”. You can create a nickname or additional users later, but this is your main login name. I normally use “admin” - as shown here. Next, select a password. Nothing as obvious as “password”, I hope. *wink*
- BASE CONFIGURATION - You will need to key in an “Admin nickname”, check your email address (it will default to your username@domainname.com), your site name and descriptive text. The descriptive text is simply a phrase that describes your blog that may or may not appear in the header, depending on your theme of choice.
- EMAIL ACCOUNT CONFIGURATION - Finally! Here you can either repeat the default email information sent to you in your Web Host’s welcome letter, or you can apply a new email address that you have already assigned within the “Mail” area of your cPanel. Either way, you need the username and password.
- CONTINUE WITH INSTALL - Once you’ve filled in the necessary fields with the appropriate text, click the Install WordPress button at the bottom of the page to take you to the 2nd of 3 steps required for WordPress Installation.
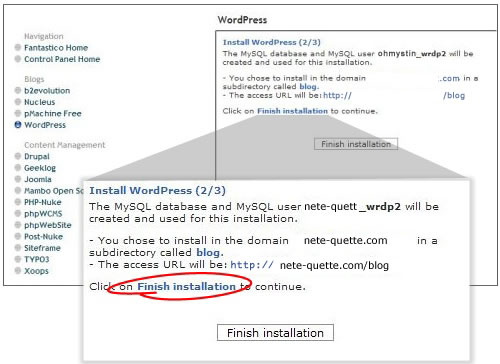
8. The second of the three steps to complete your WordPress installation is basically a review of what has been done. You will be shown your MySQL database and username that fantastico has set up for you, what directory you chose to install your wordpress blog in, what your blog address will be (in this case, because we installed in the /blog/ directory, our blog shows to be at http://nete-quette.com/blog/ ), and finally, you will be instructed to click on Finish Installation to take you to the 3rd and last step to setting up your blog!
9. And here you are, Step 3 of 3. Your WordPress blog has been installed. You are given a bit more information about the config files and then, where to login - as well as reminded about your username and password, now maybe a good idea to memorise them and finish up the install by sending yourself a copy of the information on this page. Key in your email address and click to Send E-mail - the information will be emailed to you. Ain’t life easy about now?
10. Upon checking our inbox, we found the confirmation email with the URL to log into my WordPress account. If you have followed all these steps, you too should now be able to log into your WordPress.
| We
Use and Recommend |
 |
| |